If you find prospecting hard, you are not alone.
In fact, nearly half of the sales reps surveyed by Sales Insights Lab thought prospecting to be the most challenging part of the entire sales process.
For starters, you need to fill the pipeline with as many quality prospects as possible while trying to move different prospects through different stages of the funnel with highly personalized touches. And there's a quota to meet.
There are many moving parts, so if someone ventured into it sans the proper tools and knowledge, they'd catch themselves in a tight spot.
If you are scrambling day in and day out to find, connect, engage and close prospects, consider adding LinkedIn Sales Navigator to your toolkit.
According to LinkedIn, when sales professionals use the platform, on average, they gain:
- +17% higher win rates when saving leads to Sales Navigator
- +42% larger deal sizes when using Sales Navigator to connect with decision-makers like CEOs or CXOs of their target companies.
- +15% more pipeline when using Sales Navigator to find customers
In this guide, we will take a closer look at why LinkedIn Sales Navigator is a better prospecting tool and how you can use it in your sales process for maximum productivity.
Why Should You Use LinkedIn Sales Navigator?
- It Is a Seamless Way To Tap Into LinkedIn's Lead Data
LinkedIn Sales Navigator (LSN) is a social selling tool designed by and for LinkedIn. It is the most seamless way to leverage LinkedIn–a platform with over 875 million members and 57 million registered companies–for lead generation.
As a sales navigator user, you'll always comply with LinkedIn's policies and never have to worry about the commercial use limit on searches or connections.
- Easiest Way To Find Leads And Stay Updated On Them
Sales Navigator not only helps you fetch prospects using advanced search capabilities, but it also helps you reach out to more approachable prospects through your network of teams, colleagues, and connections.
It also gives you easy access to real-time alerts on leads' LinkedIn activities, job changes in the last 3 months, and their company updates and sends you notifications when they view your profile. So you can better recognize opportunities, and connect and build relationships with your leads with more confidence.
How To Use LinkedIn Sales Navigator To Generate Leads?
LinkedIn Sales Navigator is your one-stop solution for lead generation. You can identify the right prospects, research them, and reach out to them with personalized touches from within Sales Navigator using the various features it offers.
Here’s a step-by-step guide on how to use LinkedIn Sales Navigator to generate leads:
A) To Build Your Contact List
List building is the first step of sales prospecting. It involves searching for prospects, identifying those that match your Ideal Customer Profile and categorizing them under different lists. Doing this manually is time-consuming as you've to sift through reams of unrelated data to get a promising list of prospects.
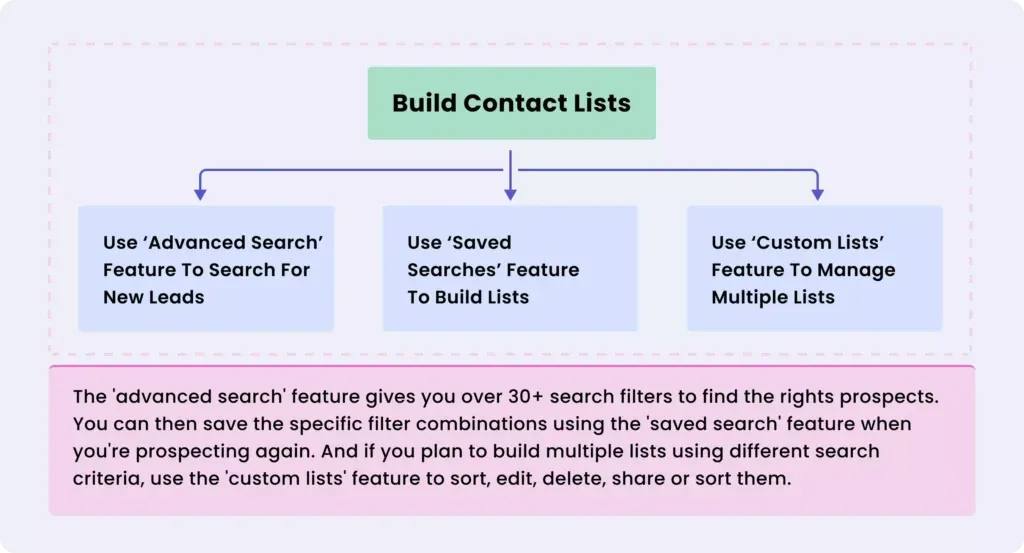
LinkedIn Sales Navigator has three nifty features that will help you streamline the list-building process and quickly identify those leads and accounts that have higher chances of converting. They are:
- Advanced Search,
- Saved Search,
- Custom Lists
-
Here’s a walkthrough of how to use these features effectively:
Ⅰ. How To Use The ‘Advanced Search’ Feature To Search For New Leads
The Advanced Search feature offers more than 30+ filters to search for specific leads and accounts.
A step-by-step breakdown of how to use Advanced Search Filters to find specific leads:
- Once on the Home Page, click the Lead Filters or Account Filters.
- Based on your choice, a collapsible 2-panel screen pops up featuring an array of filters you can use to find the right prospect–whether it be a sales manager belonging to a mid-sized company located in Colorado or a VP, marketing of a Fortune 500-based in Hong Kong. A score of filters is available for both finding leads and accounts.
- Apply the filters you want to get the desired search results.
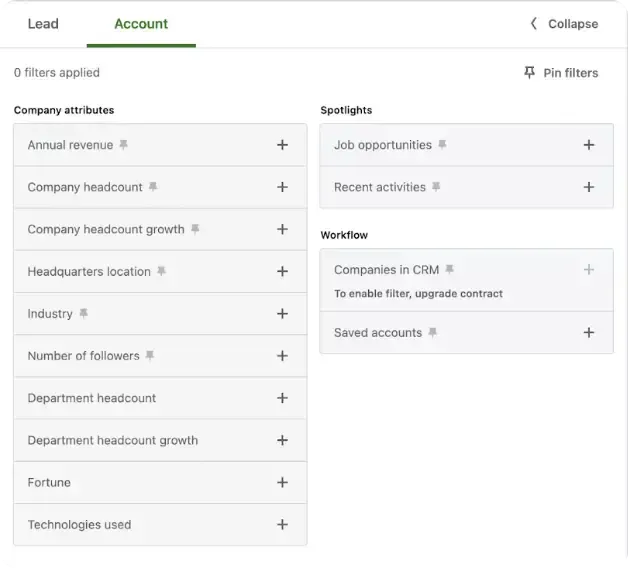
Lead-based search filters on LinkedIn Sales Navigator
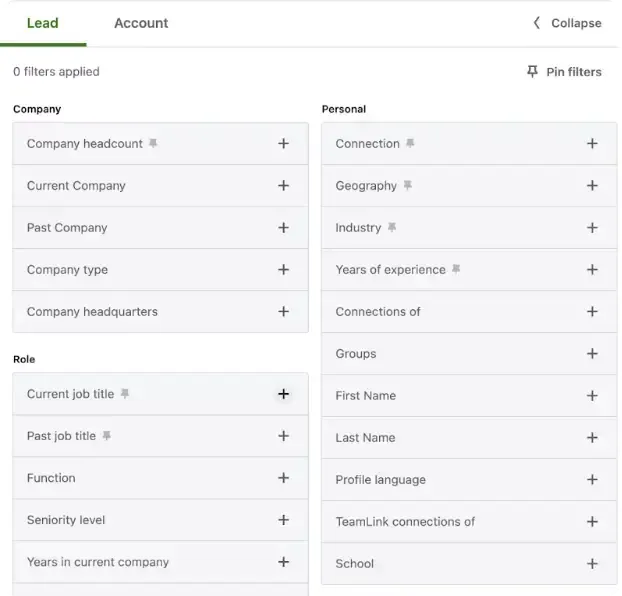
Account-based search filters on LinkedIn Sales Navigator
💡Pro tip: Apart from filters, you can also use the ‘Boolean Search' feature to find leads. ‘Quotes’, ‘AND’, ‘NOT’ ‘OR’, and ‘parentheses’ are the logical operators you can use to search for leads. For example, to find sales reps who aren’t account executives, search for “sales reps NOT account executives”.
If you feel the contacts will be a good fit, you can save them or put them on a list. Read on to find out how to save your searches.
ⅠⅠ. How To Use the ‘Saved Searches’ Feature To Build Lists?
The purpose of the ‘Saved Searches’ is to make Sales Navigator remember the search criteria you made with the specific filters. When you save a search, Sales Navigator updates the list as and when newer leads or accounts match that particular search. And you'll get notified about new additions through weekly emails or instant LSN notifications.
A step-by-step breakdown of how to save searches to build lists:
- In order to save your search, select the contacts while you are on the search results page. Then, click 'Save Search' in the tab just below the search bar.
- A pop-up window appears, prompting you to give a name to the search you are saving. Give a name – if needed set Alerts (Daily, weekly, monthly, never) – and click the green tick mark. And your search will be saved.
- To check your saved searches, click 'Saved Searches' located right next to the search bar. It will take you to a window with a list of searches you have already saved.
💡Pro tip: Sales Navigator offers seamless integrations with Salesforce and Microsoft Dynamic CRM. In order to sync your CRM with Sales Navigator, you must first install the 'CRM Sync' feature to your CRM. Head over to these pages (Salesforce), (Microsoft) for instructions on installation.
ⅠⅠⅠ. How To Use the ‘Custom Lists’ Feature To Manage Lists?
As a salesperson, staying on top of your different prospect lists is important to stay productive. Unorganized and outdated prospect lists confuse you and impact your outreach activity negatively. That’s how the ‘Custom Lists’ feature can help you. It allows you to customize how you want to sort and track your saved lists.
The custom lists feature lets you:
- Create a new list - To create a new list, click on Leads from the Sales Navigator homepage. From the dropdown list, choose Lead Lists or Account Lists. Select create lead/account list from the Account/Lead lists page. Name your list, add a description(if you want), and click Create.
- Edit an already existing list - To edit a list, choose the list you want to edit from the Lead Lists/ Account Lists. Click on the pencil icon at the top left corner and start editing.
- Sort a list - Choose the type of list, Lead Lists, or Account Lists that you want to sort. Click on the segmentation based on which you want to sort your list - Name, Account, Geography, etc.
- Share a list - This feature is available only for Advanced and Advanced Plus Sales Navigator users. Select the list you want to share from the Lead Lists/Account Lists and click on Share in the right corner. Once the list is shared, people on your dashboard can access and add private/ public notes to it.
- Delete a list - Choose the … More icons from the Lead Lists/Account Lists page. Click on Delete. You can either keep the leads/accounts and delete the list or unsave your leads/accounts before deleting the list.
- Remove or add leads/accounts in bulk from a saved list - Select those leads/accounts you want to add or delete from the My Saved Accounts or My Saved Leads page. Click on the bulleted list menu, choose Save to List, and select the list to which you want to save them. You can delete leads either from a selected list or from all lists. To do this, click on Remove and press Continue.
💡Pro tip (for Advanced and Advanced Plus users): If you have uploaded your prospect list to Sales Navigator, you can add new account lists as a .CSV file. To do this, click on the Account Lists tab, select Upload List, review the requirements to upload, and click on Continue. Once the .CSV file is uploaded, map the fields in your list with those in LinkedIn Sales Navigator, name your list, and press Finish.
B) To Research the Prospect
After pre-qualifying and building your contacts list, the next step is to track and research these leads/accounts to understand their business, challenges, and requirements in depth and find the right opportunity to present your pitch. For this, LSN has three great features:
- Lead/Accounts Page – Get insights about the lead
- Spotlights Feature – Identify the best time to reach out to your prospect
- and Alerts Feature – Get notified when your prospect expresses interest
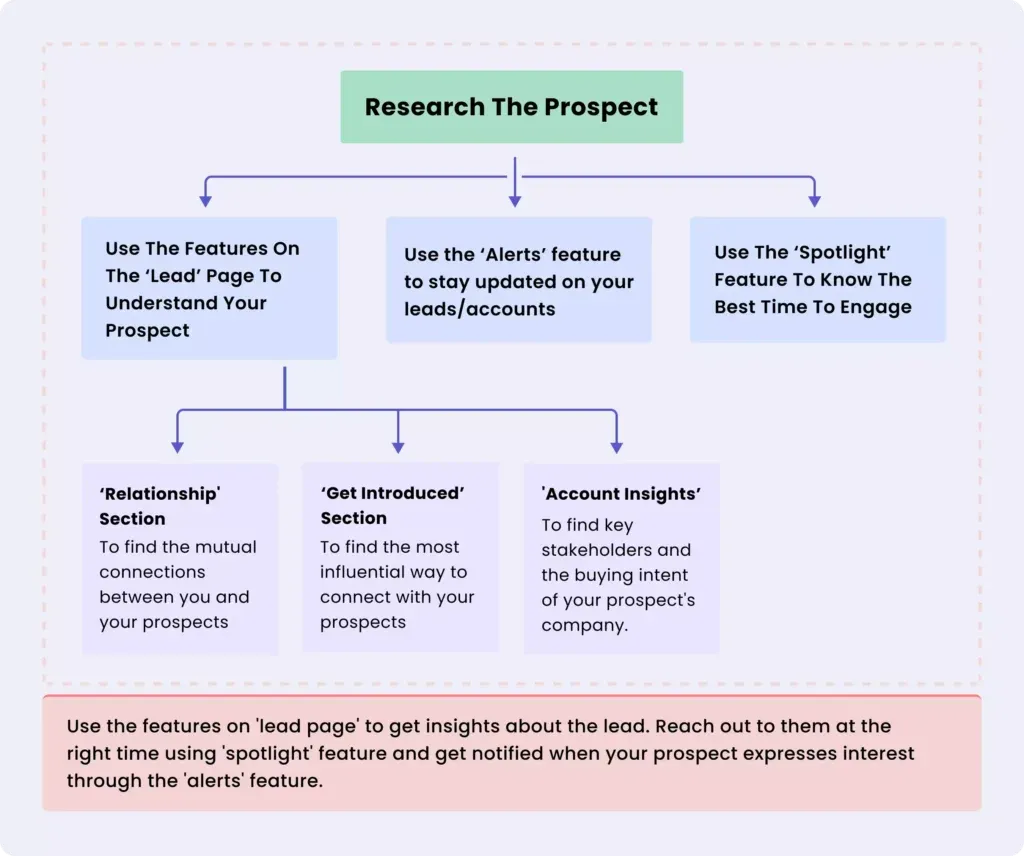
Ⅰ. How To Use the Features on the ‘Lead’ Page To Understand Your Prospect
The lead page gives you relevant information about your prospect to qualify them at the earliest. Here are some of the features that help you gain valuable insights on your prospect:
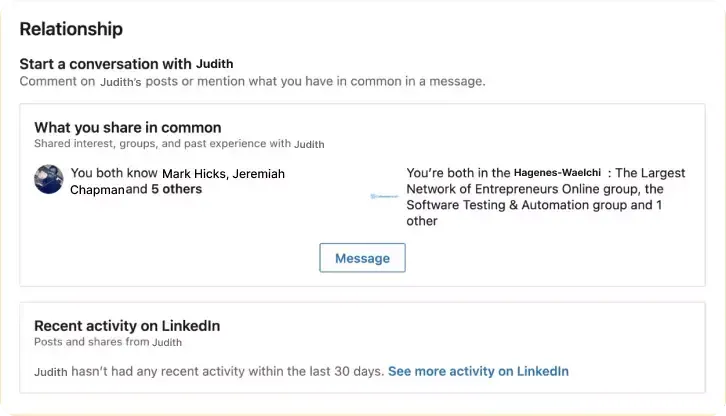
- 'Relationship' Section: This section shows the recent LinkedIn activity of your lead and things you've in common, like education, experience, and mutual LinkedIn connections and LinkedIn groups–all of which are useful in sending personalized emails.
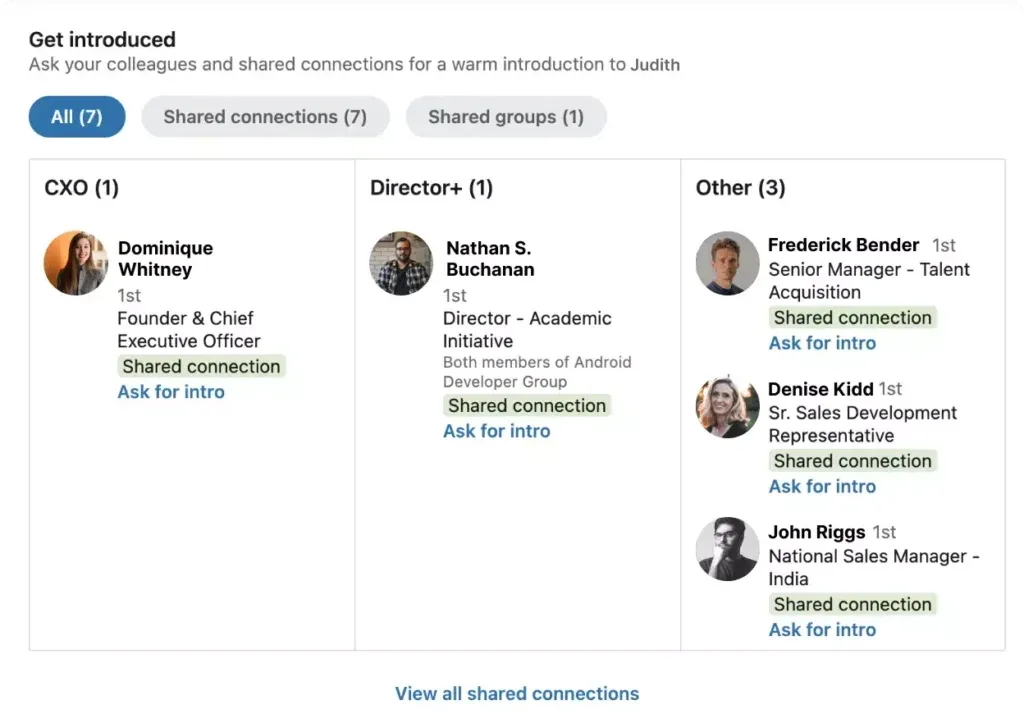
- ‘Get Introduced’ Section: This section lets you analyze the best way to connect with your lead. It shows your mutual connections in the order of seniority level so that you can trace the best route to get introduced to them. You can also view shared Teamlink connections here.
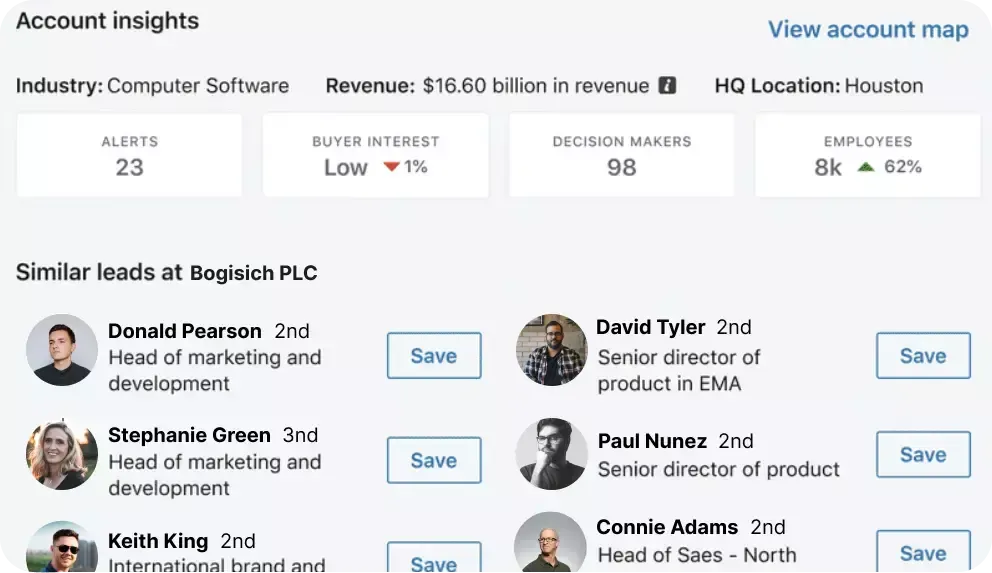
- ‘Account Insights’: Account Insights helps you view similar leads you can reach out to from the same account(company) for a multi-threaded sales approach. This is especially useful in the present scenario where losing B2B sales deals because of stakeholders switching jobs is common. This section also contains information about how interested the buyer(lead) is in your company. The Buyer Interest is gauged after careful analysis of the Inmail responses, employee interactions, ads, and company page engagement.
💡Protip: To view updates regarding your lead's company, like the company size and other details, add the preferred account to “My Priority Accounts” and get the updates on your homepage. To do this, click on the star button next to the Visit Website icon on the account page.
ⅠⅠ. How To Use the ‘Alerts’ Feature To Stay Updated on Your Leads/Accounts?
The ‘Alerts’ feature helps you track your contacts effortlessly by dishing out relevant real-time updates and insights on the leads and accounts you've saved.
Here's how you can use the Alerts feature:
- Go to the Sales Navigator Home page.
- There, in the 'Alerts' feed, you will be able to see short notifications on what's happening with your leads/accounts, who's changed their job recently, who's mentioned in the news, who's trending, and so on.
- If you filter alerts by clicking on the 'All Alerts' dropdown menu in the top-left corner of the Alerts feed. It will show you these lists:
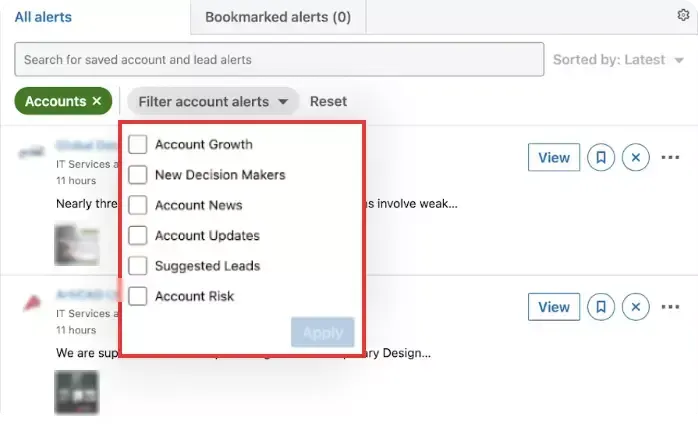
Alert filters for account-related notifications
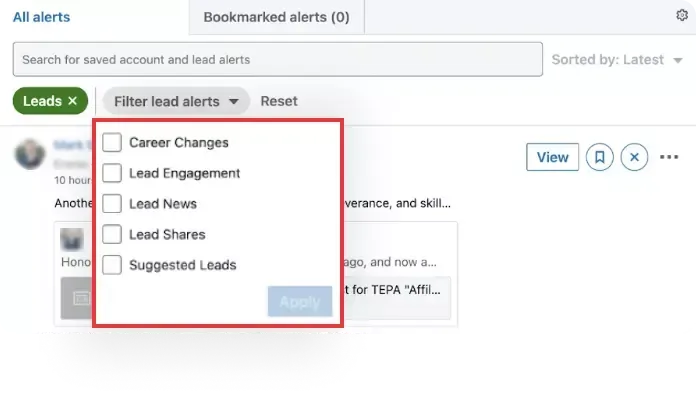
Alert filters for lead-related notifications
Choose the type of Alert you want to receive, and you're good to go.
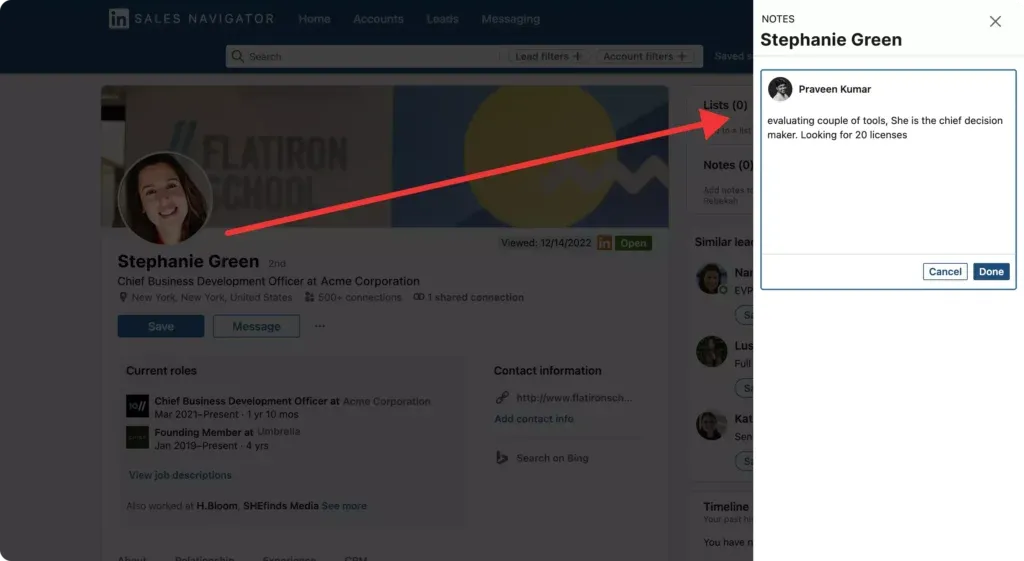
💡Protip: While tracking the activities of your new prospects and account, you can use the ‘Notes’ feature to capture your thoughts and interpretations or store relevant information and tasks on your leads page. For example, you can note down ‘sent a connection request to X lead' and share this with your sales team.
-
Notes taken down on a lead's page
ⅠⅠⅠ. How To Use the ‘Spotlight’ Feature To Know the Best Time To Engage?
The Spotlight Feature lets you identify the best time to reach out to your prospect by identifying cues that signal big changes in the prospect’s LinkedIn profile–like if they started following your business or switched roles. These changes are your cues to drop your cold email. You can find it under the ‘Lead Filters’ tab.
Here are the 6 signals LinkedIn allows you to track:
- Changed jobs in the past 90 days
- Mentioned in the news in the last 30 days.
- Posted on LinkedIn in the last 30 days.
- Following your company.
- Have shared experience.
- With Teamlink intro
💡Protip: Use the TeamLink feature to know who in your team (must be a Sales Nav user) is connected to the leads and accounts you're looking to prospect. Once you know these details, you can ask your teammate with the mutual connection to refer you to the contact.
C) To Engage the Prospect
Timely, personalized engagement with prospects is key to building great relationships and closing more deals fast. LinkedIn understands this very well and provides you two powerful features for engagement - InMail and Smart Links.
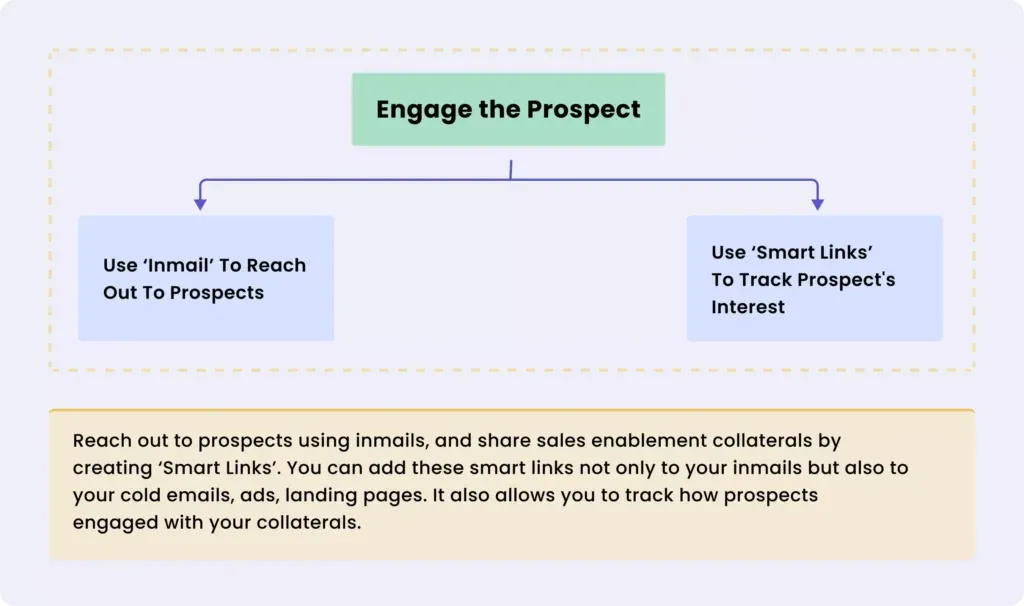
Ⅰ. How To Use ‘Inmail’ To Reach Out to Prospects?
We have all used InMails, the DM feature of LinkedIn. LinkedIn Premium account holders can send up to 15 InMails while those with a LinkedIn Sales Navigator account can send up to 50 every month, irrespective of which plan you’re in. These credits replenish at the end of each month or as and when your Inmails get replies.
There are 3 ways to send an InMail:
- When you’re on the prospect’s profile
- When you’re on the Lead/Account search results page (Click on the three dots next to the Save button, and choose the Message option.)
- When you go to the Messages page.
Tips to write the perfect LinkedIn sales message:
- Add a compelling subject line to catch the attention of your prospect. It is better to go with a subject line that's clear and direct instead of a funny or clever one.
- Personalize your introduction. Use the Spotlights Filter, Relationship Tab, or Alerts Feature to find the best conversation starter.
- Keep your Inmail messages short, not more than 150 words.
- Nudge them along the next step through a call to action. Add Smart Links if you want to gauge their interest.
Looking for LinkedIn message templates to craft your winning InMail? Check here.
ⅠⅠ. How To Use ‘Smart Links’ to Track Prospect’s Interest?
Smart Links is a nifty feature that helps you save your pitch decks, product catalogs, and more on Sales Navigator and send them off as links to your prospects from any outreach channel. It even tracks how your recipients are engaging with your content in real-time. So you can determine interest, identify other stakeholders in the decision-making process, and personalize your follow-ups accordingly.
Here's how you can create Smart Links with Sales Navigator:
- In the Sales Navigator Home Page, head to the navigation bar and click 'Smart Links.'
- This will take you to the 'Smart Links' page. Now, click the '+ New Smart Link' button.
- A pop-up screen appears, asking you to give a name and Add files. Enter the name and click Add-files.
- Choose the files you want to save from your computer. (You can add as many files as you want)
- Once your files are uploaded, click Create Smart Link. Your new file gets listed on the Smart Links page.
- To copy the link, hover the move pointer over the new file. It reveals two options: Analytics, and Copy link.
- Click 'Copy link'. And use it as you please.
💡Protip: Always use SmartLinks while sharing useful resources with prospects to track their clicks and know if they forward these resources to their team members. This way, you can connect with people with similar job titles from the same company and thus follow a multi-threaded sales approach.
Features and Plans of LinkedIn Sales Navigator
LinkedIn Sales Navigator has three plans: Core, Advanced, and Advanced Pro.
If this is your first time trying out Sales Navigator, the Core plan is the one for you. It offers essential features that every business can use to identify, understand and reach out to their prospects.
You can opt for the Advanced plan if collaborating with your sales team is a priority. This plan offers specific features like ‘Smart Links’, ‘Buyer Intent,’ and ‘Shared Lists’ to support collaboration in addition to all other features provided by the Core plan.
The Advanced Pro plan is an excellent option if you are looking for CRM integration on top of those features offered by Core or Advanced plans. To know more about these plans and their pricing, check here.
Conclusion
Sales Navigator is a natural choice for those looking for a tool to find, engage and build relationships with your target audience on LinkedIn. Its Advanced Search, Spotlights, Account Insights, and InMail features are game-changers for B2B companies looking to speed up and scale their lead generation game.
Yes, there are dozens of cheaper alternatives to LinkedIn Sales Navigator, but the reliability and safety it offers far outweigh its price.
FAQs
What can I use LinkedIn Sales Navigator for?
Do I need LinkedIn Premium if I have Sales Navigator?
What is the difference between LinkedIn Premium and LinkedIn Sales Navigator?
On the other hand, LinkedIn Business Premium is a paid version of LinkedIn that enhances your overall LinkedIn experience. It gives you access to LinkedIn subscriptions, LinkedIn's extended network, and 15 Inmail credits per month.

